在高并发连接的情况下,Nginx是Apache服务器不错的替代品。Nginx同时也可以作为7层负载均衡服务器来使用。根据我的测试结果,Nginx 0.5.33 + PHP 5.2.5 (FastCGI) 可以承受3万以上的并发连接数,相当于同等环境下Apache的10倍。
根据我的经验,4GB内存的服务器+Apache(prefork模式)一般只能处理3000个并发连接,因为它们将占用3GB以上的内存,还得为系统 预留1GB的内存。我曾经就有两台Apache服务器,因为在配置文件中设置的MaxClients为4000,当Apache并发连接数达到3800 时,导致服务器内存和Swap空间用满而崩溃。
而这台 Nginx 0.5.33 + PHP 5.2.5 (FastCGI) 服务器在3万并发连接下,开启的10个Nginx进程消耗150M内存(15M*10=150M),开启的64个php-cgi进程消耗1280M内存 (20M*64=1280M),加上系统自身消耗的内存,总共消耗不到2GB内存。如果服务器内存较小,完全可以只开启25个php-cgi进程,这样 php-cgi消耗的总内存数才500M。
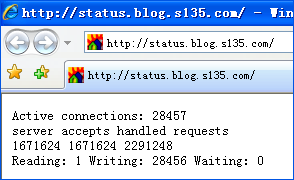
在3万并发连接下,访问Nginx 0.5.33 + PHP 5.2.5 (FastCGI) 服务器的PHP程序,仍然速度飞快。下图为Nginx的状态监控页面,显示的活动连接数为28457(关于Nginx的监控页配置,会在本文接下来所给出 的Nginx配置文件中写明):
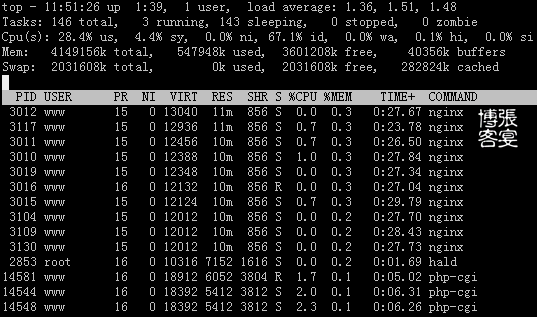
以下为 Nginx 0.5.33 + PHP 5.2.5 (FastCGI) 服务器在3万并发连接下,开启的10个Nginx进程和64个php-cgi进程时的系统负载情况:
安装步骤:
(系统要求:Linux 2.6+ 内核,本文中的Linux操作系统为CentOS 4.4)
一、获取相关开源程序:
1、下载程序源码包到当前目录:
本文中提到的所有开源软件为截止到2007年11月25日的最新稳定版。我将它们打了两个压缩包。
第一个压缩包:nginx-php-1.zip
下载地址:http://ishare.iask.sina.com.cn/cgi-bin/fileid.cgi?fileid=2746375
第二个压缩包:nginx-php-2.zip
下载地址:http://ishare.iask.sina.com.cn/cgi-bin/fileid.cgi?fileid=2746370
附:各开源软件单独下载地址(如果下载了以上两个压缩包,则无需下载以下软件):
http://down.s135.com/linux/nginx-php/ (登录用户名、密码均为blog.s135.com)
2、解压缩:
cd /data0/software
unzip nginx-php-1.zip
unzip nginx-php-2.zip
cd /data0/software/nginx-php
二、安装PHP 5.2.5(FastCGI模式)
1、编译安装PHP 5.2.5所需的支持库:
cd libiconv-1.11/
./configure --prefix=/usr/local
make
make install
cd ../
tar zxvf freetype-2.3.5.tar.gz
cd freetype-2.3.5/
./configure
make
make install
cd ../
tar zxvf libpng-1.2.20.tar.gz
cd libpng-1.2.20/
./configure
make
make install
cd ../
tar zxvf jpegsrc.v6b.tar.gz
cd jpeg-6b/
./configure --enable-static --enable-shared
make
make install
make install-lib
cd ../
#----If your system was install libxml2, you do not need to install it.----
#tar zxvf libxml2-2.6.30.tar.gz
#cd libxml2-2.6.30/
#./configure
#make
#install
#cd ../
tar zxvf libmcrypt-2.5.8.tar.gz
cd libmcrypt-2.5.8/
./configure
make
make install
/sbin/ldconfig
cd libltdl/
./configure --enable-ltdl-install
make
make install
cd ../../
tar zxvf mhash-0.9.9.tar.gz
cd mhash-0.9.9/
./configure
make
make install
cd ../
cp /usr/local/lib/libmcrypt.* /usr/lib
ln -s /usr/local/lib/libmhash.so.2 /usr/lib/libmhash.so.2
tar zxvf mcrypt-2.6.6.tar.gz
cd mcrypt-2.6.6/
./configure
make
make install
cd ../
2、编译安装MySQL 5.0.45
/usr/sbin/useradd -g mysql mysql
tar zxvf mysql-5.0.45.tar.gz
cd mysql-5.0.45
./configure --prefix=/usr/local/webserver/mysql/ --without-debug --with-unix-socket-path=/tmp/mysql.sock --with-client-ldflags=-all-static --with-mysqld-ldflags=-all-static --enable-assembler --with-extra-charsets=gbk,gb2312,utf8 --with-pthread --enable-thread-safe-client
make && make install
chmod +w /usr/local/webserver/mysql
chown -R mysql:mysql /usr/local/webserver/mysql
cp support-files/my-medium.cnf /usr/local/webserver/mysql/my.cnf
cd ../
附:以下为附加步骤,如果你想在这台服务器上运行MySQL数据库,则执行以下两步。如果你只是希望让PHP支持MySQL扩展库,能够连接其他服务器上的MySQL数据库,那么,以下两步无需执行。
①、以mysql用户帐号的身份建立数据表:
②、启动MySQL(最后的&表示在后台运行)
3、编译安装PHP(FastCGI模式)
cd php-5.2.5/
./configure --prefix=/usr/local/webserver/php --with-config-file-path=/usr/local/webserver/php/etc --with-mysql=/usr/local/webserver/mysql --with-iconv-dir=/usr/local --with-freetype-dir --with-jpeg-dir --with-png-dir --with-zlib --with-libxml-dir --enable-xml --disable-debug --disable-rpath --enable-discard-path --enable-safe-mode --enable-bcmath --enable-shmop --enable-sysvsem --enable-inline-optimization --with-curl --with-curlwrappers --enable-mbregex --enable-fastcgi --enable-force-cgi-redirect --enable-mbstring --with-mcrypt
sed -i 's#-lz -lm -lxml2 -lz -lm -lxml2 -lz -lm -lcrypt#& -liconv#' Makefile
make
make install
cp php.ini-dist /usr/local/webserver/php/etc/php.ini
cd ../
4、编译安装PHP5扩展模块
cd memcache-2.2.1/
/usr/local/webserver/php/bin/phpize
./configure --with-php-config=/usr/local/webserver/php/bin/php-config
make
make install
cd ../
cd php-5.2.5/ext/gd/
/usr/local/webserver/php/bin/phpize
./configure --with-jpeg-dir --with-png-dir --with-zlib-dir --with-ttf --with-freetype-dir --with-php-config=/usr/local/webserver/php/bin/php-config
make
make install
cd ../../../
5、修改php.ini文件
手工修改:
查找/usr/local/webserver/php/etc/php.ini中的extension_dir = "./"
修改为extension_dir = "/usr/local/webserver/php/lib/php/extensions/no-debug-non-zts-20060613/"
并在此行后增加以下几行,然后保存:
extension = "memcache.so"
extension = "gd.so"
自动修改:
若嫌手工修改麻烦,可执行以下shell命令,自动完成对php.ini文件的修改:
6、创建www用户和组,以及其使用的目录:
/usr/sbin/useradd -u 48 -g www www
mkdir -p /data0/vshare/htdocs
chmod +w /data0/vshare/htdocs
chown -R www:www /data0/vshare/htdocs
7、安装lighttpd中附带的spawn-fcgi,用来启动php-cgi
注:压缩包中的spawn-fcgi程序为已经编译成二进制的版本。
chmod +x /usr/local/webserver/php/bin/spawn-fcgi
8、启动php-cgi进程,监听127.0.0.1的10080端口,进程数为64(如果服务器内存小于3GB,可以只开启25个进程),用户为www:
三、安装Nginx 0.5.33
1、安装Nginx所需的pcre库:
cd pcre-7.2/
./configure
make && make install
cd ../
2、安装Nginx
cd nginx-0.5.33/
./configure --user=www --group=www --prefix=/usr/local/webserver/nginx --with-http_stub_status_module
make && make install
cd ../
3、创建Nginx日志目录
chmod +w /data1/logs
chown -R www:www /data1/logs
4、创建Nginx配置文件
①、在/usr/local/webserver/nginx/conf/目录中创建nginx.conf文件:
vi /usr/local/webserver/nginx/conf/nginx.conf
输入以下内容:
worker_processes 10;
error_log /data1/logs/nginx_error.log crit;
#pid logs/nginx.pid;
#Specifies the value for maximum file descriptors that can be opened by this process.
worker_rlimit_nofile 51200;
events
{
use epoll;
worker_connections 51200;
}
http
{
include conf/mime.types;
default_type application/octet-stream;
charset gb2312;
server_names_hash_bucket_size 128;
#sendfile on;
#tcp_nopush on;
keepalive_timeout 60;
tcp_nodelay on;
gzip on;
gzip_min_length 1k;
gzip_buffers 4 8k;
gzip_http_version 1.1;
gzip_types text/plain application/x-javascript text/css text/html application/xml;
server
{
listen 80;
server_name blog.s135.com;
index index.html index.htm index.php;
root /data0/vshare/htdocs;
if (-d $request_filename)
{
rewrite ^/(.*)([^/])$ http://$host/$1$2/ permanent;
}
location ~ .*\.php?$
{
include conf/fcgi.conf;
fastcgi_pass 127.0.0.1:10080;
fastcgi_index index.php;
}
log_format access '$remote_addr - $remote_user [$time_local] "$request" '
'$status $body_bytes_sent "$http_referer" '
'"$http_user_agent" $http_x_forwarded_for';
access_log /data1/logs/access.log access;
}
server
{
listen 80;
server_name status.blog.s135.com;
location / {
stub_status on;
access_log off;
}
}
}
②、在/usr/local/webserver/nginx/conf/目录中创建fcgi.conf文件:
输入以下内容:
fastcgi_param SERVER_SOFTWARE nginx;
fastcgi_param QUERY_STRING $query_string;
fastcgi_param REQUEST_METHOD $request_method;
fastcgi_param CONTENT_TYPE $content_type;
fastcgi_param CONTENT_LENGTH $content_length;
fastcgi_param SCRIPT_FILENAME $document_root$fastcgi_script_name;
fastcgi_param SCRIPT_NAME $fastcgi_script_name;
fastcgi_param REQUEST_URI $request_uri;
fastcgi_param DOCUMENT_URI $document_uri;
fastcgi_param DOCUMENT_ROOT $document_root;
fastcgi_param SERVER_PROTOCOL $server_protocol;
fastcgi_param REMOTE_ADDR $remote_addr;
fastcgi_param REMOTE_PORT $remote_port;
fastcgi_param SERVER_ADDR $server_addr;
fastcgi_param SERVER_PORT $server_port;
fastcgi_param SERVER_NAME $server_name;
# PHP only, required if PHP was built with --enable-force-cgi-redirect
#fastcgi_param REDIRECT_STATUS 200;
5、启动Nginx
/usr/local/webserver/nginx/sbin/nginx -c /usr/local/webserver/nginx/conf/nginx.conf
四、配置开机自动启动Nginx + PHP
在末尾增加以下内容:
/usr/local/webserver/php/bin/spawn-fcgi -a 127.0.0.1 -p 10080 -C 64 -u www -f /usr/local/webserver/php/bin/php-cgi
/usr/local/webserver/nginx/sbin/nginx -c /usr/local/webserver/nginx/conf/nginx.conf
五、优化Linux内核参数
在末尾增加以下内容:
net.ipv4.tcp_keepalive_time = 300
net.ipv4.tcp_syncookies = 1
net.ipv4.tcp_tw_reuse = 1
net.ipv4.tcp_tw_recycle = 1
net.ipv4.ip_local_port_range = 5000 65000
使配置立即生效:
六、在不停止Nginx服务的情况下平滑变更Nginx配置
(1)、修改/usr/local/webserver/nginx/conf/nginx.conf配置文件后,请执行以下命令检查配置文件是否正确:
如果屏幕显示以下两行信息,说明配置文件正确:
the configuration file /usr/local/webserver/nginx/conf/nginx.conf syntax is ok
the configuration file /usr/local/webserver/nginx/conf/nginx.conf was tested successfully
(2)、这时,输入以下命令查看Nginx主进程号:
屏幕显示的即为Nginx主进程号,例如:
6302
这时,执行以下命令即可使修改过的Nginx配置文件生效:
(全文完)